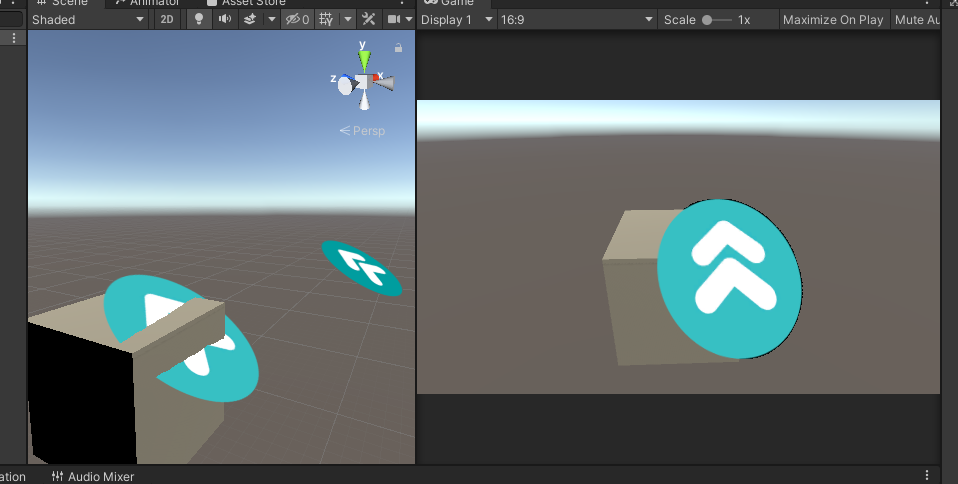
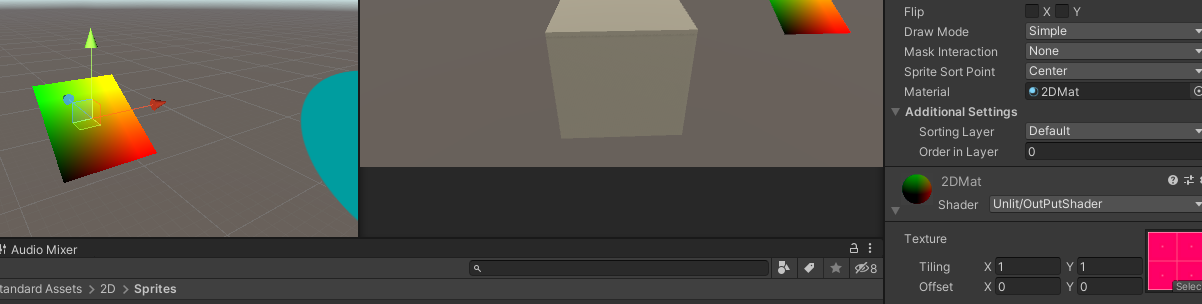
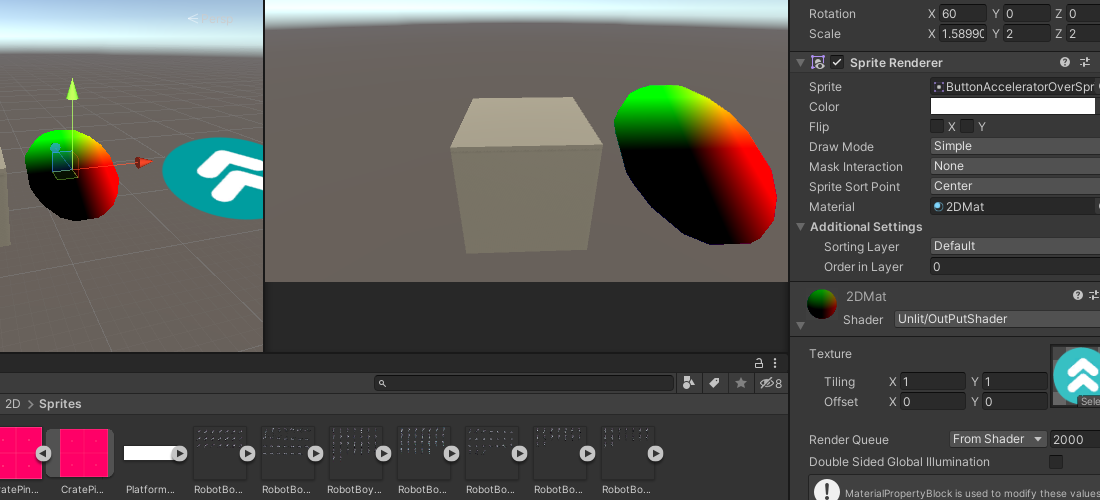
1
2
3
4
5
6
7
8
9
10
11
12
13
14
15
16
17
18
19
20
21
22
23
24
25
26
27
28
29
30
31
32
33
34
35
36
37
38
39
40
41
42
43
44
45
46
47
48
49
50
51
52
53
54
55
56
57
58
59
60
61
62
63
64
65
66
67
68
69
70
71
72
73
74
75
76
77
78
79
80
81
82
83
84
85
86
87
88
89
90
91
92
93
94
95
96
97
| Shader "Unlit/2DUnlitShader"
{
//MARKER:注意在使用的时候必须保证Scale的Y与Z相同
Properties
{
_MainTex ("Texture", 2D) = "white" {}
_RotateAngle("RotateAngle", Range(0, 90)) = 30
_CenterOffset("CenterOffset", Vector) = (0,0,0,0)
}
SubShader
{
Tags { "RenderType"="Opaque" }
LOD 100
Blend SrcAlpha OneMinusSrcAlpha
Pass
{
CGPROGRAM
#pragma vertex vert
#pragma fragment frag
// make fog work
#pragma multi_compile_fog
#include "UnityCG.cginc"
struct appdata
{
float4 vertex : POSITION;
float2 uv : TEXCOORD0;
};
struct v2f
{
float2 uv : TEXCOORD0;
UNITY_FOG_COORDS(1)
float4 vertex : SV_POSITION;
};
sampler2D _MainTex;
float4 _MainTex_ST;
float _RotateAngle;
float4 _CenterOffset;
float _Output;
float4 Rotate(float angle, float4 vertexPos)
{
float cosNum = cos(angle * 3.1415926 / 180);
float sinNum = sin(angle * 3.1415926 / 180);
float4x4 rotateY = float4x4(1, 0, 0, 0,
0, cosNum, sinNum, 0,
0, -sinNum, cosNum, 0,
0, 0, 0, 1);
//旋转中心点(根据模型空间中心点所在位置来调整,正常的spine做的模型脚下旋转的点就是(0,0), 可以省去下面这一步和已经旋转完成后的 + center操作)
half2 center = half2(-_CenterOffset.z, -_CenterOffset.y);
vertexPos.zy -= center;
float4 result = mul(rotateY, vertexPos);
result.zy += center;
return result;
}
v2f vert (appdata v)
{
v2f o;
o.vertex = UnityObjectToClipPos(v.vertex);
o.uv = TRANSFORM_TEX(v.uv, _MainTex);
UNITY_TRANSFER_FOG(o,o.vertex);
// 修改对应的顶点位置,同时修改深度
float4 p = Rotate(_RotateAngle, v.vertex);
p = UnityObjectToClipPos(p);
o.vertex.z = p.z / p.w * o.vertex.w;
//o.vertex = p; //MARKER:用于查看写入深度
return o;
}
fixed4 frag (v2f i) : SV_Target
{
// sample the texture
fixed4 col = tex2D(_MainTex, i.uv);
// apply fog
UNITY_APPLY_FOG(i.fogCoord, col);
clip(col.a - 0.01f);
return col;
}
ENDCG
}
}
}
|